This tutorial shows how to create schedule items for working and non-working times. Setting up the schedule items will make the schedule view show a better estimation for when plates will be completed cutting as work times, breaks, holidays and maintenance can be accounted for.
Create Working Times
In this example we will set up a standard working week, Shift 1, from 7am to 3pm weekdays.
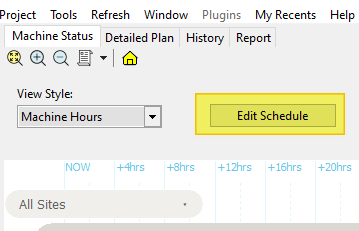
1.Open the Planning mode.
2.From any of the "view styles", press the Edit Schedule button. If the Edit Schedule button is not visible, complete the tutorial Giving Users Edit Schedule Permission to enable it.
3.The Edit Schedule Items dialog will be shown.
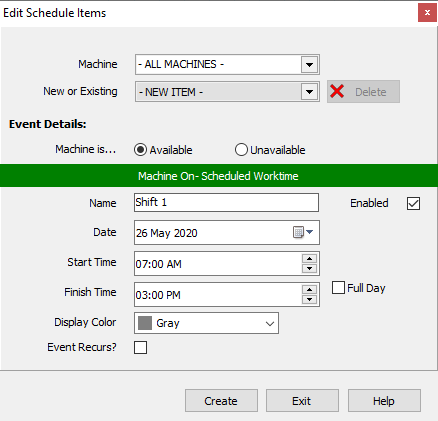
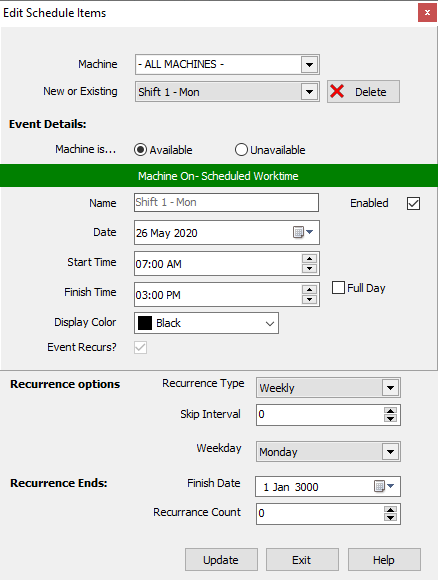
4.Machine: We can select the machine we are creating schedule windows for, useful if machines have different working times, from the Machine dropdown menu. In this tutorial we want to create a schedule item for all machines at once, so leave it as the default - ALL MACHINES -.
5.New or Existing: We are creating a new item rather than editing an existing one, so we select - NEW ITEM -
6.Machine is: For creating work times when the machine(s) are in operation we have the Available radio button checked and the Status will be green saying "Machine On-Scheduled Worktime". The alternative, Unavailable, is for creating non working times such as breaks, holidays, and maintenance outages. Note that Machine available and unavailable windows may overlap, but the unavailable one takes preference. For example, lunch breaks can be added in the middle of a shift, holidays can be scheduled on top of regular work days, maintenance breaks can be scheduled in working hours.
7.Name: We can enter a name for the schedule item - something like 'working hours' may be a good choice, to not be confused with lunch breaks, holidays or maintenance times. We will call it "Shift 1".
8.Date: The date we can ignore for now, as we are going to create a recurrent schedule for the working times. However the schedule "starts" on this date so it is usually set to today, or a time in the recent past.
9.Start Time, Finish Time: When the shift begins and ends each day. We can edit it later to change one day to be different for example. Set the day to start at 7:00AM and end at 3:00PM.
10.Display Color: The color of the header bars in the schedule view.
11.Event Recurs? As we do not want to create every workday from now on by hand, we are going to check the Event Recurs? checkbox, this will expand the dialog to show the recurrence options:
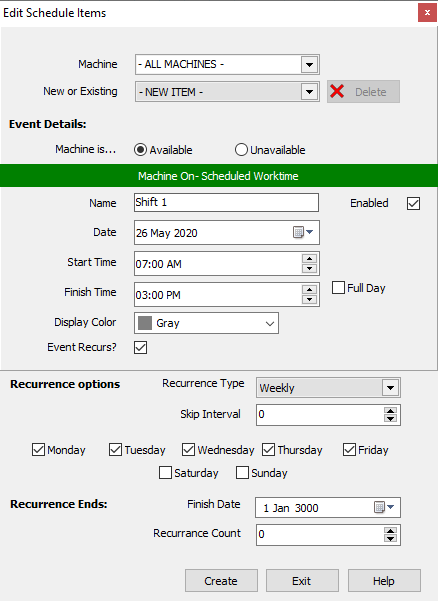
12.Recurrence Type: We want this to occur on certain days of the week, Monday-Friday, so we choose a weekly recurrence, and set the weekdays it is valid for.
13.Skip Interval: should be 0 as we work every week not every second (skip interval = 1) or third (skip interval = 2) week.
14.Select the weekdays we are active on.
NOTE this will create 5 separate schedule items, one for each day, so afterward we can edit them individually.
15.Finish Date and Recurrence Count: By default these are set to a day far into the future, and a Recurrence count of 0. If Recurrence count is >0, then that will determine how many times the event can recur.
16.Now we can press Create and items will be created for the selected days on the one or all machines.
After pressing create we can navigate the New or Existing combo box and we will see our five newly created schedule items, Shift 1 - Mon through Shift 1 - Fri. As discussed above these can be edited individually now, so for example the Friday shift could have its Finish Time shortened to 2.30pm. Shifts can also be edited by Machine; not all machines need to run the same shifts.
NOTE: Any schedule entries can be Enabled or disabled via the checkbox. This is particularly useful if extra shifts are added during busy times; they can be created and simply disabled when not needed during quieter periods.
Create Non-Working Times
Regular breaks can be scheduled, such as lunch breaks, over the top of the scheduled work times. Whether you should do this depends on how your organization runs its machines. If the machine is expected to keep running during breaks, there is no need to add a scheduled break. If the machine is expected to run partially through a break, then you may add a shortened break time to accommodate this "on average".
Create a Recurring Meal Break: Lunchbreak
As above we are going to make a recurrent schedule item
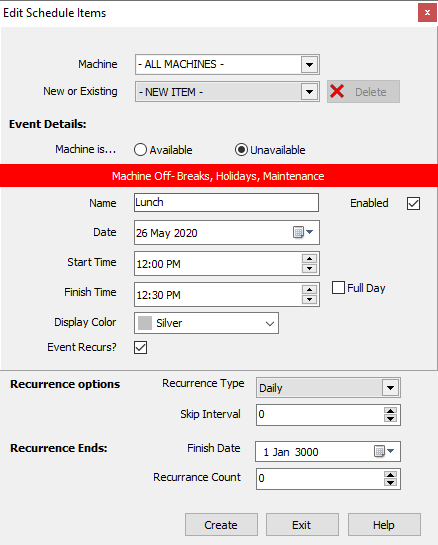
1.New or Existing should again be on the - NEW ITEM - option, as we are adding a new meal break
2.Machine is: this time we select Unavailable
3.Set the Name, Start Time, Finish Time, and check Event Recurs
4.This time we set the Recurrence Type to Daily. It does not matter that this will recur on Saturdays and Sundays where we have no scheduled worktime, and it is simpler to add one schedule event than 5. Also should we add extra weekend shifts at a later date, the lunch break will already be set up for the weekends. If lunchbreak times are different on different days, then you may choose a weekly recurrence.
5.Finally, press Create.
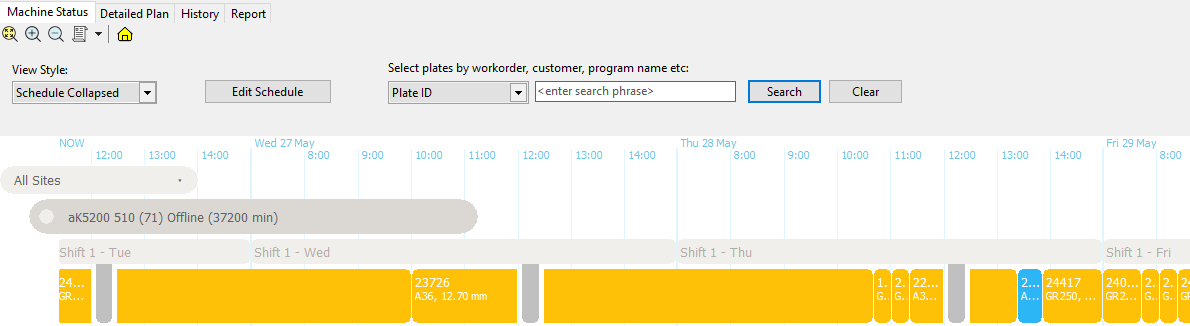
The effect of our schedule creation can be seen below. You may need to close and reopen the planning mode to view your changes. Here we are viewing in Schedule Collapsed mode, which hides time windows outside of Machine Available times (from 3pm to 7am, and weekends, in our case). Here I am viewing the schedule at approximately 11:20am on a Tuesday, and you can see the first lunchbreak coming up at midday, represented by the grey downward bar from the Machine Available bar above showing the shifts. Note that programs "jump over" the breaks, ie it is expected that cutting will stop at the start of lunch and recommence afterwards.