Overview
An overview of the integration between Strumis and PrimeCut:
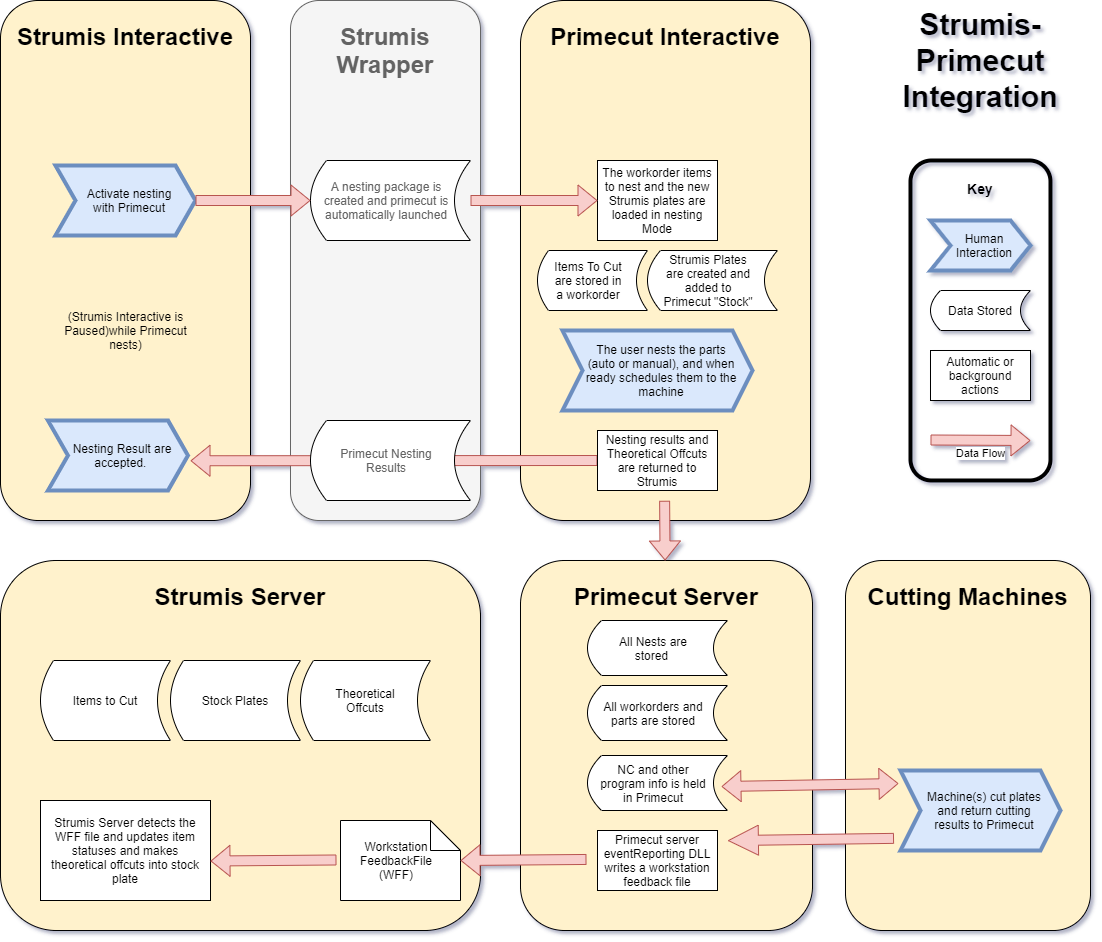
Strumis uses PrimeCut as its Nesting Engine.
Strumis does all the plate stock management. In PrimeCut, the plates are marked as
Strumis plates and given an identifier that is used to match them between PrimeCut
and Strumis.
Strumis automatically opens PrimeCut, and runs it.
Primecut receives the supply (plates) and demand (parts), and setting information from
Strumis including the machine to be used to process the parts.
Primecut then:
•Processes the parts, adding cutting, bevelling and similar instructions for the
machine.
•Nests the parts on to the plates.
•Labels the parts using information from Strumis.
•Optimises the processing.
•Schedules the plate to be cut and otherwise handled with the machine specified.
•Primecut then sends the results of the nest back to Strumis.
PrimeCut operation is mostly automatic, but does require some user intervention.
PrimeCut can return offcuts to Strumis. This is limited by Strumis to one offcut per
plate.
Strumis can call PrimeCut to nest new parts on to plates it has previously processed
with PrimeCut.
It can clear the plate and renest the original and new parts together, or it can nest the
new parts in the space remaining on the plate.
Strumis can call PrimeCut to edit a nest on plates it has previously processed with
PrimeCut - that is remove parts that have already been nested.
Prerequisite Installs
1. Strumis
We are assuming you have the Strumis client installed and running on your
computer, in this location:
C:\Program Files\AceCad Software Ltd\StruM.I.S evolution
\ACESMClient.Exe
We are also assuming have you a Strumis server and database configured.
The nesting examples shown below use the Strumis server and database we
at Kinetic have configured. Yours will look a bit different.
2. PrimeCut
We are assuming you have the PrimeCut client installed and running on your
computer, in this the default location for 32bit PrimeCut installs:
C:\Program Files (x86)\Primecut4\PrimeCut4.exe
If you have a 64bit PrimeCut, the default install location is:
C:\Program Files\Primecut4\PrimeCut4.exe
We are also assuming you have a PrimeCut server configured.
You need to know
•The name of the PrimeCut server
•The name of its datastore
•The username and password you will be using for Strumis to login to PrimeCut
Installing StrumisPrimeCutWrapper
StrumisPrimeCutWrapper is the software that performs the two-way communication
between Strumis and PrimeCut.
StrumisPrimeCutWrapper consists of two files:
StrumisPrimeCutWrapper.dll The program (DLL) that does the communication.
StrumisPrimeCutWrapper.ini The initialisation file for
StrumisPrimeCutWrapper.dll, that tells it where to find PrimeCut and other
configuration information.
1. Copy the Files
Create a folder
C:\Program Files\AceCad Software Ltd\StruM.I.S evolution
\StrumisPrimeCutWrapper\
Copy the files StrumisPrimeCutWrapper.dll and StrumisPrimeCutWrapper.ini
into this folder.
2. Edit StrumisPrimeCutWrapper.ini
Open StrumisPrimeCutWrapper.ini in a text editor
The contents of the file should look something like:
[Folders]
outputFolder=C:\Data\StrumisPrimeCut
[Settings]
customer= BIG CUSTOMER
defaultmachinename=K5000 Bay 1
primecutExe= C:\Program Files (x86)\Primecut4\PrimeCut4.exe
username=administrator
password=abc123
server=OurPrimeCutServer
datastore=production
You will need to edit the file to match your own setup.
Note that these settings are case sensitive.
Don’t forget to save your changes!
Note that there are no spaces either side of the equals signs, =
Lines in can be commented out by setting the leftmost character to a semicolon
e.g.
;this is a comment
The meaning on each line is as follows:
[Folders]
Required
A tag to indicate that the folder(s) are to follow.
outputFolder=C:\Data\StrumisPrimeCut
Required
StrumisPrimeCutWrapper sends and receives data by saving files to disk.
outputFolder is the location where these files will be written to, and read from.
If this folder does not already exist, StrumisPrimeCutWrapper will create it.
Set outputFolder to a suitable location on disk, that you have full read/write
access to.
[Settings]
Required
A tag to indicate the settings are to follow.
customer=BIG CUSTOMER
Required
PrimeCut requires a customer for its jobs. This customer must exist in the
PrimeCut server.
The password to log in to the PrimeCut server.
Set the customer value to the name of the customer for this job.
defaultmachinename=K5000 Bay 1
Optional
PrimeCut needs to know which machine to use. Strumis will supply the machine
name, but if you want to override it or supply a default, set it here.
primecutExe= C:\Program Files (x86)\Primecut4\PrimeCut4.exe
Required
The location of the PrimeCut executable file, so Strumis knows where to find it.
username=administrator
Required
The username to log in to the PrimeCut server.
Set it to the username you are using for Strumis to login to PrimeCut.
NOTE Primecut v4.5.487 onwards (#14261): Setting
username=<WINDOWS_USER> will substitute the user’s Windows user name as
the Primecut username. A primecut user by this name must already be setup of
course.
password=abc123
Required
The password to log in to the PrimeCut server.
Set it to the password you are using for Strumis to login to PrimeCut.
If there is no password, set it as follows:
password=
NOTE you can set password=none to force it to login with a blank password,
primecut 4.5.487 (#14261) onwards
server=OurPrimeCutServer
Required
The name of the PrimeCut server.
Set it to the name of your server!
datastore=production
Required
The datastore on the PrimeCut server.
Set it to the name of your datastore!
5. Configuring Strumis to Use PrimeCut
1. Install the PrimeCut Strumis Plugin DLL
Copy the file Strumis_Plugin_DLL.dll in to the folder
C:\Program Files (x86)\Primecut4\plugins
(or if you have 64 bit Primecut, C:\ Program Files\Primecut4\plugins )
This DLL controls how Primecut processes Strumis data.
Note that this is a different to and separate DLL from the
StrumisPrimeCutWrapper mentioned above.
2. Setting Strumis to use StrumisPrimeCutWrapper as its Nesting Engine
Start Strumis.
Click on System (at bottom right), then in Setup, Facility.
Double click on the Default line, then select the Options tab.
Under Nest Engine Settings, Plate Nesting Engine to Use, enter
StrumisPrimeCutWrapper.
You will need to click the … build button the first time to manually type in the
name of the wrapper into the list.
Ensure the checkboxes Prompt User to edit a nest and Show the nesting
Application when performing a nest are checked.
Save (at bottom right)
See image below:
3. Creating Multiple Wrapper
Instances
It may be useful to create additional PrimecutStrumis Wrappers, example use
cases include:
Multiple sites in Strumis using different default machines
If the Strumis and Primecut are run on an RDP server, to allow separate Primecut
usernames
In order to set up one or more alternative Strumis Wrappers do the following:
Copy the StrumisPrimecutWrapper subfolder C:\Program Files\AceCad Software
Ltd\StruM.I.S evolution\StrumisPrimeCutWrapper\ to a new folder eg
“StrumisPrimecutWrapper2”. The name can be anything, eg “Primecut Missouri”
Go into the newly copied folder and rename the dll AND the ini file ( support
added in issue #14278) to match the folder name , ie “StrumisPrimecutWrapper2” or
“Primecut Missouri” in the examples above.
Edit the ini file with the changes, eg different default machine, output folder,
username, password
Add the wrapper via the Strumis System menu as described above.
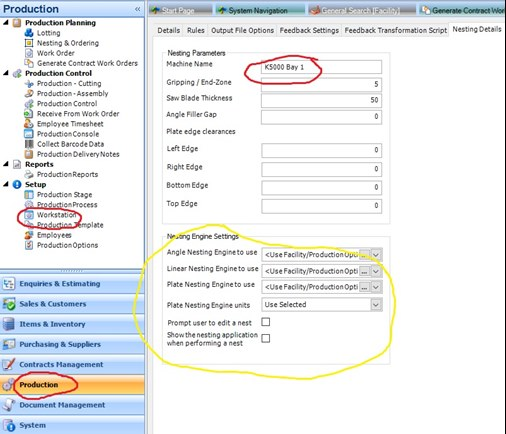
1. Setting Strumis to use the PrimeCut Machine for processing.
We are assuming you know the name of the machine in PrimeCut you are going to
use for processing. In this example, we will use the name K5000 Bay 1
In Strumis;
Click on Production (at bottom right), then in Setup, Workstation.
Double click on the workstation line you are concerned with, e.g. Saw.
Select the Nesting Details tab.
Under Nesting Parameters, set the Machine Name, in this case to K5000 Bay 1.
See red highlights on image below:
(Looks like you can also set the workstation to use StrumisPrimeCutWrapper
here - see yellow highlights)
Note that you will have to Generate Contract Work Orders for the Marks you are
processing, so that the Marks have a Workstation and hence a machine name
assigned.
Note that as we mentioned above, you can override any machine name set in
Strumis by setting the default machine name with a line like:
defaultmachinename=K5000 Bay 1
in StrumisPrimeCutWrapper.ini
2. Item Labelling
PrimeCut can label the parts with information supplied to it by Strumis.
To set this up, hit Production at the bottom left, then Production Options.
Under Nesting Engine Settings, you can see the checkbox Apply Item Marking.
Check this if you want Strumis to supply label information to be used by PrimeCut to
label parts.
The line Item Marking Text Template controls what will be used as the part label.
Here it is set to %markitem% , so parts will be labelled with the Mark Item as
shown on the Nesting and Ordering tab, e.g. w1054 for the parts nested in the
examples below.
See Strumis help for more information about Item Marking Text Template
Here is a close up:
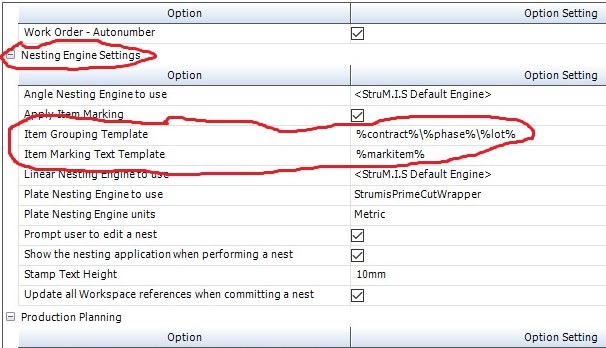
3. Workorder Naming
Primecut uses information supplied by Strumis to name its work orders, as well as
a unique timestamp generated by StrumisPrimeCutWrapper.
See also section below 6.1.2 Custom Naming of Invoice Number and Purchase
Order
The information from Strumis that PrimeCut uses is the Item Grouping Template,
as shown in the Nesting Engine Settings above.
Here it is set to %contract%\%phase%\%lot% , so the Strumis Grouping will be
set to
C-00007\W+C\1 in the examples below.
See Strumis help for more information about Item Grouping Template
The unique timestamp is generated by StrumisPrimeCutWrapper every time a
Strumis job is sent to PrimeCut (see below)
It is of the form 2017_08_07_10_27_25 . e.g.
Year_Month_Day_Hour_Minute_Second
There is nothing to configure with respect to the unique timestamp.