The geometry editor has a new button in the left hand column called Part Harvesting, which initiates a process where Primecut will scan a compound drawing looking for individual parts to split out and add as separate workorder or quote line items.
In doing this Primecut must:
1.Recognize individual profile geometry
2.Recognize and gather possible additional geometries (such as folding drawings, dimensions etc)
3.Gather all related text labels and their text
4.Recognize from the gathered text the Quantity Required
5.Recognize from the gathered text the Material and Thickness
6.Recognize from the gathered text the Part Name
For a profile to be auto harvested from a drawing all of quantity, material, thickness and part name must be determined. If any are not, the profile will be skipped. The user can then select the remaining profiles and manually create items using the Harvest Item From (H) function (see Manual Part Harvesting).
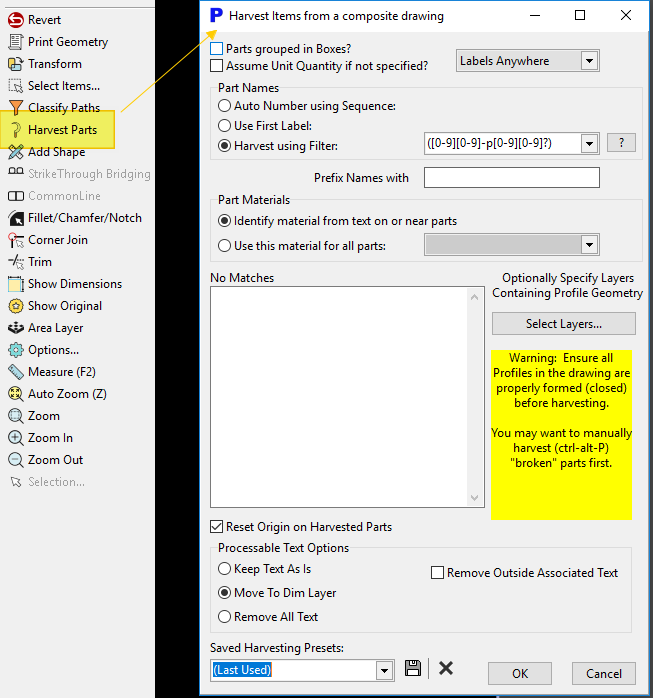
Save Harvesting Presets
Many options are provided to control how the auto harvest is to be performed. Different customers will often supply their composite drawings formatted differently, so at the bottom there is the ability to Save Harvesting Presets, allowing you to store all settings that were used for a particular drawing for use again later .
Most of the options are described below, however a couple are worth mentioning here:
Parts Grouped in Boxes
If the composite drawing has grouping boxes drawn around the parts this should be ticked. If ticked ONLY parts within boxes will be harvested. each part can be within its own box, or the parts may be grouped in multiple boxes, or all the parts may be together in a single box. The boxes help separate parts from each other.
Select Layers
Clicking this allows you to select which layers contain the profile geometry, see below. The image above shows the dialog after Select Layers has been clicked.
These are the steps the harvester takes as it identifies parts:
Profile Recognition (Step 1)
At step 1, closed paths are identified as being possible profiles. A layer filter can also be applied specifying which layers the profiles are in thus excluding other manufacturing drawings which may be present from the item list. By default the layer filter is set to include all processable, visible layers. ie if additional manufacturing sketches, isometric views etc are put into non-processable layers they will not be recognized as profiles but can still be imported into the nearest profile as additional manufacturing information.
Gathering Other Adjacent Geometry And Text (Steps 2,3)
In gathering additional geometry and labels (steps 2 and 3 above), proximity is the sole criterion. ie if a label or text item is closer to a profile than to any other profile, it will be associated with it and gathered into the same line item drawing.
The following lines of text will all result in a quantity of 7 being applied, as well as any case variations of these (ie “quantity” = “QUANTITY”):
7 of
7 off
7 Reqd
7 Rqd
7 required
qty7
Qty 7
Qty-7
Qty – 7
Qty : 7
Quantity 7
Quantity – 7
Quantity : 7
The following are also recognized in version 4.5.357 on:
7x
7 x
x7
x 7
Bracketed versions are also recognized, eg “(7 of)”. Recognition is NOT case sensitive so for example qty, QTY and Qty all work.
•To prevent false positives:
The quantity number will not be recognized if it contains a decimal point.
•To prevent ambiguity:
The quantity will not be recognized if more than one valid quantity specifier is found. An example we have seen which prompted this behavior is as follows:
Part ABC
Mild Steel 10mm
cut 1 off LH
cut 1 off RH
In this example, there are in fact two parts to be cut. Seeing multiple quantity specifiers we actively fail to recognize quantity, and so will not automatically harvest this part, leaving it up to the programmer whether to create a single line item with quantity 2 or whether he needs to create two mirrored versions of this item.
Assume Unit Quantity if not Specified?
There is also an option to assume unit quantity if no quantity specifier is found (Assume Unit Quantity…). In an multiple match case as above the unit quantity will not be applied and regardless and the part will still not be auto harvested. This option should be checked when
Harvesting Parts from Nests- in this case Primecut will check each part harvested against those already loaded in the workspace, and will look for matching geometry (so long as material is compatible also); in this way Primecut can convert a nested plated into quantities of unique parts when harvesting.
Recognizing Material And Thickness (Step 5)
Material and Thickness is recognized. Material and thickness should be adjacent to each other, and material can be a family, or an alias for a database material. See Material Aliases.
Recognizing Part Name (Step 6)
There are three options for recognizing or otherwise setting an automatic part name:
1.Auto Number Using a Sequence: No recognition is performed, instead the parts are simply named sequentially using a format string, where the part number is substituted for %d. Some examples follow:
ITEM %d results in ITEM 1, ITEM 2 etc
3259-A-%d results in 3259-A-1, 3259-A-2 etc
3259-A results in 3259-A, 3259-A ie all parts named the same (database settings must allow duplicate part names for this to be effective)
2.Use First Label: After Quantity and material thickness have been recognized, the part name will be set to the first remaining non blank text found, this suits simple well drawn compound drawings where the text is composed of ONLY quantity, material, thickness and part name.
3.Harvest Using Filter: This is a more advanced feature that allows the user to specify the expected format of the part name by means of a regular expression. The regular expression will return the match found within simple parentheses. The matching names will by highlighted in the drawing as the regular expression is modified, and the harvested names and their count will be shown. The ? button takes you to a website where you can experiment with, test and learn about regular expressions. They are powerful but can be somewhat complex. Primecut remembers for each user the last 30 harvest filters applied.
If more than one match is found for a part when harvesting, no name will be matched.
In some cases not all parts in a nest may be labeled. This is particularly the case when reading nests where someone may have labeled one of a series of similar parts, where its obvious to a human that these are all the same part. Uncheck this to prevent the harvest process stopping when names are not found. Unchecking this also relaxes the geometry matching when Harvesting Parts From Nests to not check labels, so that a labeled part and an unlabeled part will still match.
Names can also be Prefixed after recognition with some fixed text, such as "Part ", "Item ". Thus, if "1234" was recognized, an the Prefix Names With was set to "Item ", the part name will be set to "Item 1234".
Regular Expression Matching For Part Name Examples
Regular Expressions are a power way to control what is recognized. There are many resources on the internet describing how to use them, see for example https://regex101.com/ .
Consider the following example:
(\bITEM ?[\-: ]? ?[w]+)
This matches any of the following:
Item 123
ITEM : 123
Item A2
Item-1
([A-Za-z0-9]+-[A-Za-z0-9]+)
This matches any of the following:
A-1
AB-123
123-ABC
This does not match:
A – 1
A -1
A- 1
Regular Expression Matching of Part Names spread over Multiple Lines
Sometimes the drawing contains multiple lines which needed to be concatentated together to get the unique name, eg:
DRW-1234
Item 6
and the name we want is "DRW-1234 Item 6".
The following Regular Expression will do the job:
(DRW-\d+\s+Item\s+\d+)
Explaining this:
•(...) what is actually captured as the part name is what is inside the braces, no braces, no name captured. This means you can capture only part of the matched pattern if required.
•DRW- literal start of the name
•\d+ 1 or more digits for the drawing number
•\s+ one or more whitespace, this can include linebreaks for partnames as of version 4.131.538
•Item literal start of next line
•\s+ 1 or more whitespace
•\d+ 1 or more digits for the item number
There are options to deal with text processing:
•Keep Text as Is- Text within or near the part is preserved, keeping its layer information
•Move To Dim Layer- Text within or near the part is preserved, but treated as Dimension (non-processable text)- recommended.
•Remove all Text- Text within or near the part is removed altogether, but only after it has been used to recognize part name, grade thickness and quantity as above.
...and...
•Remove Outside Associated Text- This is applied after the filters above, and will remove any processable text outside of the part, ie leaves on-part text they may be intended for marking but removes the rest.
See Also