See also
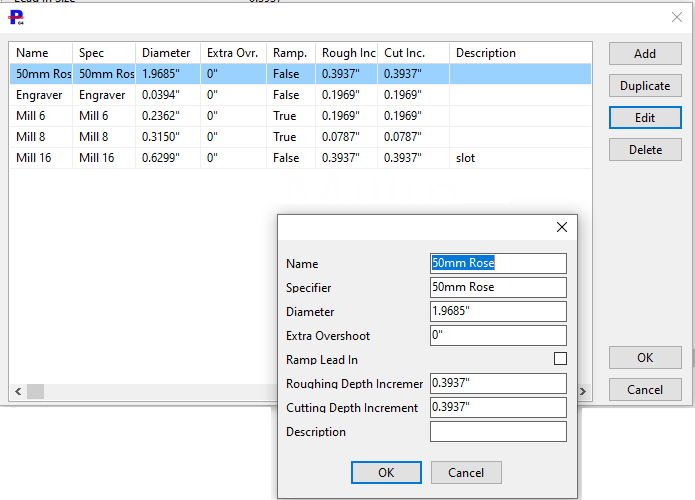
To access the Milling Bit Table you need to open the Machines mode and expand the tree for the Milling tool that you want to work with. The second to last item in the tree will be the Bit Table (as shown in the illustration below) and to the right of this is the Edit button.
If there is no milling tool set up currently contact Kinetic to get advice on creating one. It is relatively easy, but must be done correctly.
When you press the Edit button the Milling Bit Table will be displayed.

▪Add will create a new milling bit and display a dialog that allows you to enter the desired parameters.
▪Duplicate will copy the currently selected milling bit so that you can borrow the parameters from it rather than creating a bit from a blank template.
▪When you select a bit and press Edit you will be able to modify the settings using the dialog. The same thing can be done by DOUBLE CLICKING on the bit details.
▪As you might expect Delete will delete the currently selected bit from the table.
▪Ok will exit and save changes whereas Cancel will exit and ignore any changes made to the table.
Each bit has the following properties:
Name
A unique name that is used to identify the bit within PrimeCut.
Specifier
The specifier that is used to select the bit on the machine. It must match the tool name that is used on the machine. You may have two bits with the same specifier if the same bit is to be used for different operations.
Diameter
The physical diameter of the bit. This is used to calculate the center path when the machine in question requires explicit kerf offsets in the NC code. This value can be modified in the Processing editor when the milling path is being created.
Extra Overshoot
When milling all the way through the plate this value is added to the depth of the cut to ensure the plate is completely penetrated. This value can also be edited in the Processing editor.
Ramp Lead In
Determined where leadins will be ramped or plunged. Can also be changed in the Processing editor.
Roughing Depth Increment
How deep to go per cut if it is a roughing process, i.e. the milling bit is being used to cut through the plate, and will be used later for a finishing pass. Can be edited in Processing editor
Cutting Depth Increment
How deep to go per cut if it is a finishing cut process. Can be edited in Processing editor.
Description
A description of the bit and the selected parameter values. If this contains the word Slot then this bit can be used to SmartSlot a slot of the same diameter as the bit.