The following typical milling applications are supported in PrimeCut, and below you will find tips on how to apply processing in each instance:
Slot milling:
Using SmartSlot: This identifies slot geometry and will automatically select a bit from the bit table of matching diameter, however the bit must contain the word "Slot" (not case sensitive) in its bit description. This is to prevent say a facemill being accidentally applied to a slot. SmartSlot will apply a no kerf centerline path automatically, and gives you 3 options:
1.Standard (involves plunging and full retract): After each path the tool will retract fully and return to its start point and plunge to the new depth.
2.Step (involves plunging): At the end of each depth pass the tool will not retract but will step down by the depth increment (ie plunge) and reverse direction.

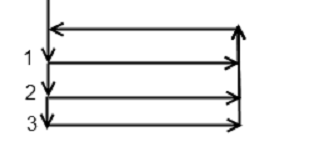
3.ZigZag (no plunging): The tool feeds down and at an angle during each depth pass, achieving one depth increment per pass, in a zig-zag fashion. When final depth is achieved a final pass is done at constant depth.

Be sure to use an appropriate type of mill for slotting, e.g. a slot drill: many milling bits will not plunge as they cannot cut in their center. ZigZag is preferred for normal endmills.
Other Slot Techniques
Often it may be preferable to drill a series of holes through the slot to begin with, to reduce the amount of material the mill has to remove and to aid with clearing the swarf, and prevent the teeth getting clogged.
If you do not have a tool of the correct diameter, you can interpolate around the slot as per usual- depending on the size of the slot you may want to do a rough cut with plasma as detailed below, or pre drill a series of holes as above.
Machining cutouts in parts (large holes etc):
Typically a cutting tool such as flame or plasma is used as the roughing cut with say a 3mm or 1/8" roughing offset, and a pause is inserted in the sequencing editor to allow the operator to remove the slug or slugs, the the mill is interpolated around the cut. The sequence is very important: roughing cut, pause to remove slug, mill. See also Horizontal Roughing and Finishing
You can use the Dynamic Offset function in the geometry editor to generate nested internal offset paths to accommodate pocketing.
In order to facemill a part you should draw in geometry mode the (usually) open path you want to the facemill to follow, typically parallel lines spaced slightly less than the diameter of the facemilling tool apart. Apply the milling tool to the created path with a shallow depth with no kerf, and ensure the depth increment of the milling tool properties is greater than the depth you require to ensure a single pass only is required.
Tips on milling full depth:
Depth is of course specified from the top of the plate down. When milling to full depth you can specify either zero depth or specify the depth explicitly. The latter approach is recommended so the programmer controls the overshoot, otherwise the overshoot is set on the materials page of the machine and the programmer has no knowledge of how deep the final pass will be.
Choose the depth increment as large as possible a) to minimize milling time and b) to use a greater depth of the cutting teeth on the tool, thus increasing its effective life. If for example your depth increment is set very small, say 1mm, then only the bottom 1mm of the mill will do all the cutting work.
Cutting direction
Climb milling (kerf left) is preferred if the workpiece is rigidly held and the tool is substantial and not prone to vibration. The tool "rubs" less in this mode, biting into the material as each tooth hits- may provide better tool life.
Conventional (kerf right) is preferred otherwise, it is more stable but may rub more, as the teeth slide into and across the already cut material until they begin to peel a thin sliver of material, which grows to be thick as the teeth exit the cut zone.