DEPRECATED SmartCluster now provides more automated tools to support this functionality, however in some special cases you may need or want to still use the older functionality
In this section:
Bridge Cutting is where you use one pierce to cut a number of parts. This is especially useful where oxy cutting is being used because of the time taken to pierce the plate. It is also useful for plasma cut parts in order to reduce wear on consumables.
The most critical factor involved in successful bridge cutting relates to how the parts are nested on the plate. By giving some thought to this process you can use the weight of the plate to prevent partially cut parts from moving and thereby ensure the success of the cut.
Here are a few points to keep in mind:
▪Do not make bridge cuts excessively long. A good general guide is to keep then to about a metre (or three feet) in length, although if you have a 1.2m wide plate it would be ok to make a bridge span this distance.
▪Be conscious of the amount of plate that is left to hold your parts. If you are nesting your bridge on a small remnant of plate, then there will be a higher likelihood of movement and you should make you bridge cut smaller. If on the other hand you are dealing with a large plate, then you could make your bridge cut over a metre long because there will be very little chance of the plate moving.
▪Try to use Manual StrikeThrough Bridging (as opposed to Auto-StrikeThrough) because this will give you more control over the placement of the bridging lines.
▪Process the bridge cut before nesting on the plate so you have more control over leadin placement.
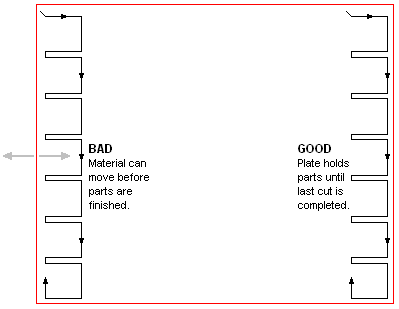
▪Nest your bridged parts so that the last cut to be made if facing the 'meat' of the plate, not the edge. This is illustrated more clearly below.
