This tutorial shows you how to modify costing data for existing spindle tools and to add costing data for new spindle tools. This data is for costing purposes only and has no bearing on the NC code sent to the machine. The Feed Rate, Extra Overshoot and Start time information are used to estimate the time taken to drill the holes. The Feed Rate should match what is set on the Materials page in TouchCut (machine controller software). The Cost per Stat, Length and Hour are used for quoting purposes to determine the cost of the spindle operations. There is a unique set of costing data per material grade so harder grades can have slower feed rates.
1Click on the Process Data button from the home screen.
2Click on the Drilling and Milling tab at the top of the window.
3Click on GR250(A36). A costing data table should appear in the large window on the right.
4Double click on the "KSEM14.00" drill to edit the costing data.
5Change the Vertical Feedrate to "768mm/min" as 550mm/min is too conservative. Click OK.
6Double click on the KSEM18.00 drill and change the Vertical Feedrate to "693mm/min" to reflect a change in the settings on the machine. Click OK.
7Click the Add Spindle ![]() button to bring up the Spindle Costing window.
button to bring up the Spindle Costing window.
8Select KSEM1.500" from the dropdown list in the Name field. The spindles in the dropdown are those that already exist in the Spindle Allocation Table. If the spindle isn't in the dropdown, the full name can be typed in the Name field.
9Enter the following into the relevant fields:
Vertical Feedrate = 573mm/min
Start Time = 4sec
Extra Travel = 10mm
Diameter = 1.5"
Tip Angle = 135 Deg
Cost Per Start = $1.00
Click OK.
10Add a new spindle with the following information by repeating steps 7 - 8. You will need to type the full name of the spindle, as KSEMP40.00mm isn't in the spindle allocation table.
Name = KSEMP40.00mm
Vertical Feedrate = 261.6mm/min
Start Time = 4sec
Extra Travel = 10mm
Diameter = 40mm
Tip Angle = 135 Deg
Cost/Length = $6.70
11Add a new tap with the following information by repeating steps 7 - 8.
Name = M24
Vertical Feedrate = 485.1mm/min
Start Time = 6sec
Extra Travel = 8mm
Diameter = 24mm
Tip Angle = 135 Deg
Cost/Length = $8
A more appropriate name for this tool would be TAP M24 so that it is more obvious that it is a Tap and not a drill bit or other tool. It is important to come up with a good naming scheme early on and ensure the tools entered into TouchCut follow this scheme as well.
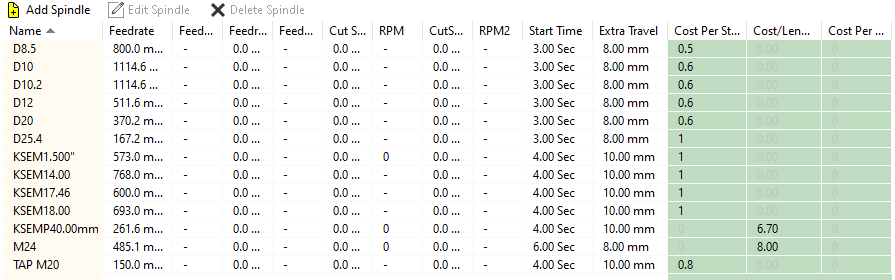
The finished result will look like this:
12Click on GR300(A633A). Notice how the costing data is empty in the large window on the right. Now we will copy the spindle costing data from the GR250(A36) to GR300(A633A). Since the grades both fall into Kennametal's P2 material category, the same speeds and feeds can be used. In practise there may be slight variation between the grades.
13Click on GR250(A36) and press the Copy button.
14Check GR300(A633A), Check Copy Spindles, Un-check Copy Cutting, Marking, Beveling. Click OK.
Notice how the new spindles that were previously added have not been copied across to GR300(A633A). This is because we have not closed the Process Data window after adding the new spindles so they have not been committed to the database yet.
15Press the OK button in the lower right hand corner of the window and click Yes to confirm you want to write the updates to the database.
16Go back into the Process Data and click on GR250(A36) and the Drilling and Milling tab. Notice how the recently added spindles are still there because they have been saved.
17Repeat step 13-14 to copy the new spindles across to GR300(A633A). See that the new spindles have been copied.
18Click the Cancel button in the lower right of the window. This is to simulate a situation where you have wrongly copied some costing data but the changes have not yet been committed to the database (by pressing OK) and you wish to restore the data.
19Go back to the GR300(A663A) grade in the Process Data to check the new spindles are no longer copied over.
This concludes the tutorial.