Tagging can also be done on a Milling Process, see Tagging a Milling Process.
Also see Microjointing which allows a specific gap size to be set during processing at the start of the cut.
Parts should sometimes be left "tagged" or "tabbed" into the plate:
•On sheetmetal, and cutting small parts, to stop them falling or tipping
•On large parts from plate, to prevent them deforming as they are cut; especially long narrow parts.
•For Rolling, to prevent large parts distorting during rolling, they are sometimes left connected to their parent plate throughout the rolling process.
To add tags to a part:
1.Process the part with a Cutting Tool
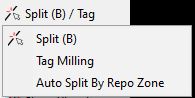
2.Press the Split (B) / Tag > Split (B) button on the toolbar or use its shortcut Key B.
3.Confirm the Base Width / Gap. If you want the split setting to be saved under a name and associated against the controller/machine you can type the name in the combo box and click the save Icon.
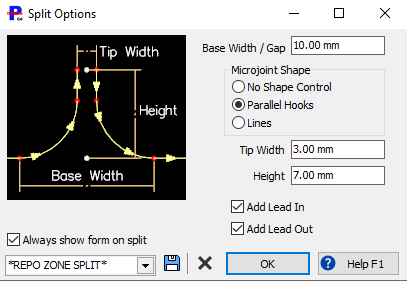
The Microjoint Shape options are:
•No Shape Control : no leads will be added as part of the created split, but leads can also be added as part of the cut later.
•Parallel Hooks : Arc/hook leads will be added tangential to each cut and ending in parallel (if long enough), with a consistent Tip Width between lead ends. Sometimes leads default to linear to avoid crossing internal geometry. if the base width is smaller than the tip width, the tip width will be reduced to match.
•Linear : straight leads will be added not tangential to the cut, with a fixed tip width. Linear leads can have a tip width wider than the base width.
Height is measured in the direction of the average perpendicular vector of the two cuts, and is the height of the shortest of the two leads (one may be extended to achieve the same tip width, for example if it's on a corner).
Unchecking Add Lead In (and similarly for Add Lead Out) will remove the lead in or lead out for the process ends that comprise the split. Note a process may be reversed, in which case the split may have two lead ins or two lead outs, and each of these options applies to both leads.
Checking Add Snip Cut will add a seperate cutting process to the end of the processable being cut, just long enough to snip the split. The snip process can be reversed in order to take advantage of if a leadin is being used without a leadout, so the snip cut can use the same pierce hole. The snip can also be placed anywhere up the split from 0 being at the split base to 1 being at the split tip. Once applied leads can be added to the split cut as well. Snip cuts can be added to the splits via the
Splits can be selected and dragged, and the properties above can be edited in their Properties window. The angle of the leads can also be adjusted, either relative to the default perpendicular, or relative to vertical on the plate.
4.Indicate the Tag locations
Adjusting leads:
If there is a microjoint shape applied, then lead properties can be adjusted by changing the properties:

MJ Angle sets the angle of the uncut center line that the lead tips must be symmetrical around.
If MJ Angle is Absolute is checked, then when the angle of the centerline is measured relative to vertical on the plate, otherwise it is measured relative to the perpendicular of the split.
To stop the split taking control of the leads, set MJ Shape to No Shape Control.
Snips can be added to splits by checking the Snipped box.
Split snips are also able to be modified (e.g. leads added and moved) and copied to other splits using 'Copy Split Snip Process to Similar' in the right click menu.
Just as a reminder it is possible to edit all the leads together once they have been set to No Shape Control
1.Select all the cut segments
2.In Properties, check the Leadin box and apply
3.Press Alt-I to select all the newly added Leadins
4.Adjust via their Properties the size, shape etc.

Tags added to hold a long part in the plate while it is cut