The Kinetic plasma bevel is able to generate cutting angles of between -45 degrees and 45 degrees, and some custom Kinetic gas bevels can obtain between -70 and 70 degrees. The first point to be aware of is the distinction between negative and positive bevel angles.
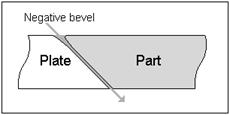
As you can see in the above illustration a negative bevel results in the top surface of the part being larger than the bottom surface. Generally it is preferable to use a negative bevel since it is easier to remove the part from the plate, and part accuracy is generally higher. The tradeoff is that a negative bevel can result in rounding of the top edge.
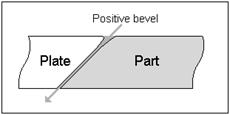
The positive bevel is of course the opposite. As you would expect (in the case of the simple knife-edge bevel) it is more difficult to remove the part from the plate, and you will also see more dimensional variability. The advantage of the positive bevel is that you can create a sharper knife-edge, which in some cases may be the primary aim. With a compound bevel the removal of the part is no longer an issue since the extra cuts will allow the part to be removed in any case.
When operating at the upper limits of the bevel angle there are extra demands on the operator because correct machine set up will be crucial to achieving accurate part dimensions.
With vertically cut parts we can be relatively relaxed about the processing and sequencing of cutting. This is not the case when using the bevel. Parts with bevel geometry should be processed at the part level before being nested on the plate. This will ensure that corner loops can be accommodated, and gives greater control over the various aspects of processing. This is especially the case when processing a multiple bevel part, where the sequencing of the processes at the part level becomes critical. In fact this sequencing will change depending on whether you are cutting with flame or plasma.
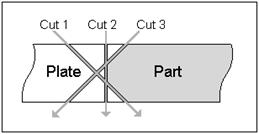
When cutting with Oxy-Acetylene the overriding priority is to ensure that the flame does not cross any air gaps in the material before reaching the surface to be cut. If this is not adhered to then the flame will not cut cleanly, if at all. The illustration below shows the correct sequencing when creating a K-bevel using flame.
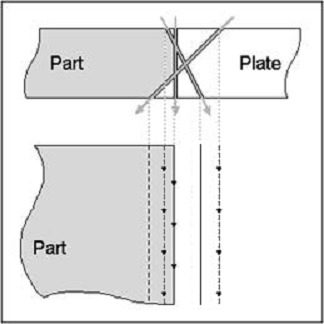
When cutting with plasma the issue becomes one of height control. Voltage feedback is used to control the torch height, and consequently if the plasma is cutting across a gap we can encounter problems especially when using the bevel. As a result the general rule is to cut the bevel geometry first, and vertical cuts later. In the case of a K-bevel it is likely that you will need to use trial and error to find an approach that best suits your purposes. In some cases it may be necessary for the machine operator to use manual height control.
We obviously need a standard notation for what the 2D geometry lines represent in 3D. We recommend using the Geometry Defines Top Path option in the bevel geometry wizard. Using this standard, we can see where the beveling tool will go. This can be selected in the properties tab of a processing path.
If not set : For Zero and Negative bevel angles, where the bevel cuts under the part, it has no real effect. But when the bevel angle is positive it defines whether the geometry the bevel process was applied defines the top path of the cut, or the bottom edge of the positive knife bevel.
The vertical arrowed lines are the ones that PrimeCut requires in order to create the respective bevel paths.
Offsetting
Offsetting is used to create the geometry required to act as the path along which either (if Geometry defines extents is selected) the maximum extents of the part side of the cut follows or (if Geometry defines top path is selected) the path the torch will follow along the top of the plate.
We recommend always working with Geometry Defines Top Path selected, as it prevents overlapping geometry in the case of a vertically symmetrical bevel.
You could create your own offset geometry and cut it with a bevel, but it is easier to use the Multiple Bevel Wizard, as we will see.