MultiBox nesting is the use of two or more cutting tools simultaneously to cut two or more distinct parts.
Compare with
•MultiCut (using multiple cutting tools within a part, eg Stripping)
•MultiAxis (using multiple cutting tools on multiple paths, eg mirror cutting, tower cutting.)
Generally this will be with either oxy-fuel torches or plasma. PrimeCutNE makes this a relatively easy task, because the only place you need to explicitly specify that the program will be MultiBox is in the nesting editor. Once this is done PrimeCutNE takes care of the rest.
Parts must be nested manually when performing MultiBox nesting, although after the MultiBox nest has been created you can use auto-nesting to fill any gaps on the plate with smaller parts. It is also possible to nest some parts for MultiBox cutting and others for single box, which allows you to mix parts that are too large to be nested side by side.
In order for MultiBox processing to work you will first need to select the machine you are creating a nest for. This ensures that PrimeCutNE is 'aware' of where the slave carriages are located relative to the main carriage. If the selected machine does not have multiple carriages, PrimeCutNE will still allow you nest parts for MultiBox but the NC codes generated will only be for single box.
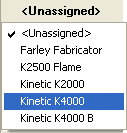
1.Select the desired machine from the drop-down menu at the top of the Nesting Editor toolbar.

2.Click on the AutoNesting Options Button, it will appear as (1 Box, Auto) or similar:

The AutoNesting Options Dialog will be displayed so that you can change the MultiBox settings.

3.Select the desired Number of Boxes and choose your own spacing as desired.
If you leave the Manual Box Spacing check box un-ticked, then PrimeCut will automatically space the carriages to half the width of the plate. Generally this is what is wanted, but if you are trying something different you can tick the box and choose your own spacing.
4.Drag parts onto the plate as you normally would when performing manual nesting. You will notice extra copies as per the quantity of boxes specified. You can create an array, or use other nesting features just as you would for single box nesting.
5.Remember that you can nest some parts to be cut as single box and others to be cut as MultiBox - you could even choose to nest some parts as single box, some as twin, and (assuming you have enough carriages on your machine) some as triple. Just change the settings and nest the parts, PrimeCut will take care of the rest.
See also: