Autonesting Expectations
Autonesting is a very hard problem computationally. The human brain is very good at recognizing shapes and how they fit best together. We believe PrimecutNE's autonesting algorithms are best in field, but that does not mean that they will not sometimes produce an unexpectedly poor result. Generally however they will quickly produce good quality nests comparable in quality to those of a human programmer, and when the quantity of parts is large, often better than a human programmer.
When autonesting does produce a nest which is not good enough, Manual Nesting can be used to adjust it. Manual Nesting of a few large or awkward parts before autonesting can also be used to help produce a good result, as can clustering of groups of parts.
Primecut provides a number of AutoNesting algorithms, some with parameters, to control how Primecut will approach the nesting problem, these are controlled by Auto Nesting Options.
Autonesting from the Nesting Editor
Autonesting can be done in various ways, the simplest of which is to open a plate in the nesting editor, along with a number of parts to be nested. Note in the parts explorer at top left that 11 of 124 are nested, some of these parts have been nested on other plates. We can sort by the To Nest column if we wish. To start nesting, we click the Nest All button highlighted OR as we have done here we can click the button above to check our nesting options first, and there is a Nest All button provided on this dialog also.
Nest All will nest all the parts it can with a compatible grade and thickness to the plate

While Autonesting is in progress, you will see the Autonesting Progress Dialog: (the appearance of this may differ depending on the nesting options in effect). You can Stop the nesting at any point, and if any solutions have been found it will keep the best solution found so far. Reduce Graphics reduces the number of screen updates and may improve performance as a result.
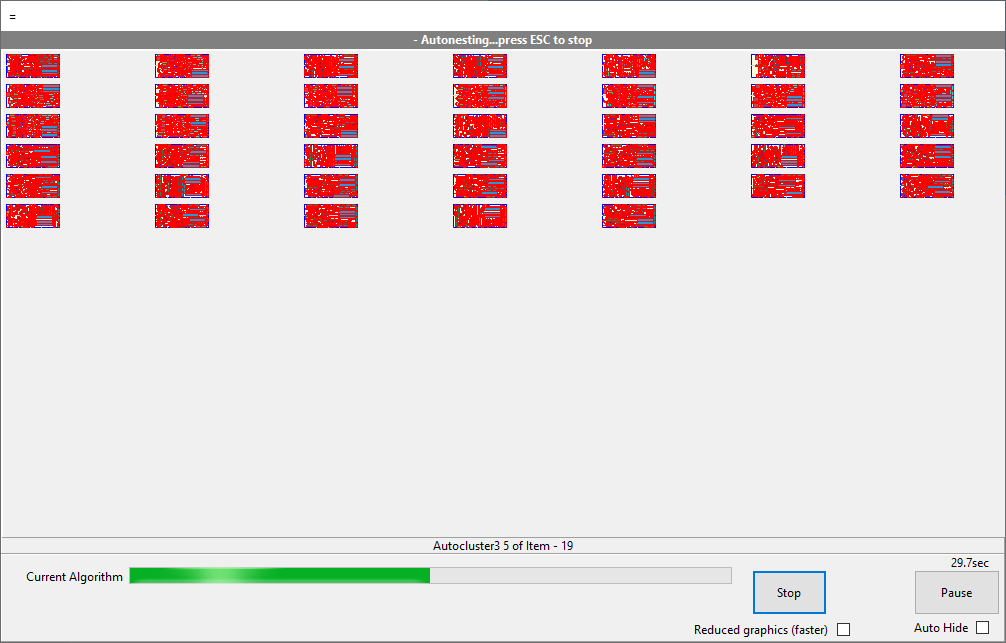
When nesting has completed you are presented with the best solution as evaluated by the software. In this case 97 "solutions" were found, only one nested all the parts, but in many cases several solutions may nest all the parts especially when only part of the plate is used, and though PrimeCut chooses the best based on its criteria, the user may choose a different one by moving the slider, from Best to Worst.

Nest Quality Evaluation
Internally PrimeCut scores every nest it creates to determine whether nest A is better than nest B. Several criteria are judged including:
•Weight of parts nested, more is better! This is the most important criterion.
•Spread of the nest, especially along the plate long axis but also across the plate short axis.
•Nest regularity: arrays and clusters in regular patterns receive a boost over seemingly random arrangements.
Autonesting from the Explorers
The wand button in the nest explorer allows you to nest into multiple plates at once. First open the parts to nest (as above) and also the plates you want to nest onto. Autonesting proceeds in a similar fashion to nesting a single plate; plate by plate through the plates in the plate explorer. You can use the arrow buttons to reorder the plates so they get presented to the nesting engine in a certain order.
In Nested Quoting mode there is an additional red Explorer nesting button which will create and add dummy plates on the fly to the plates explorer, using plate templates if available, or global defaults. If multiple templates are available for a given grade and thickness, the template used is controlled by this setting.
Parts can also be dragged from the parts explorer down onto plates in the plates explorer, and the parts dragged will autonest.
Autonesting from the Plate Selector
There is an Auto Nest button in the plate selector, allowing you to nest parts open in your parts explorer directly into database plates. The order in which plates are tried can be controlled, for example you may want to try nesting onto remnants first ahead of new plates, or small plates before big plates etc. Only plates shown by the current filters are selected, so the selector filters can be used to narrow down what plates are used.
The plates are locked and opened sequentially (only plates for which grade and thickness compatible parts are still to be nested will be opened and locked). If parts can be successfully nested on the opened plate, they are, and the plate is added to the plates explorer in the local user's workspace. If no parts are able to be nested, the plate is unlocked, and effectively returned to the database untouched, and the next plate is tried. The process repeats until either all parts have been nested or all plates in the current view have been tested.
Sorting Plates for Autonesting
The order plates are displayed in is the order in which they will be nested onto. You can sort the plates in various ways; by double clicking on the column headers to sort by that column (repeat on the same column reverses the direction of sort), by manually arranging the plates with the arrow buttons or using the Sort button to sort by other criteria, such as "Nested Remnants, then Nested Plates, then Empty Remnants".
![]()
Reorder plates for Autonesting using these arrow buttons, or using the Sort function
The plate Sort Ordering Dialog will look something like this.
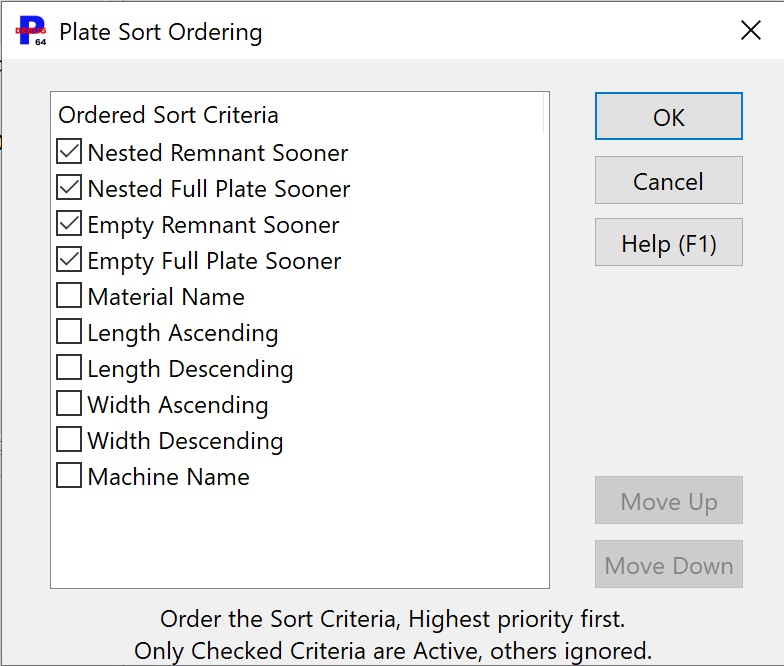
The sort configuration above will order by nested remnants first, then nested new plates, then all other plates. This is a typical configuration for Autonesting, where we want to "fill up" plates we have already nested parts on, before nesting on clean plates.
The Sort Ordering is stored in the user settings in two places, one for regular nesting, and one for quote nesting.
QuickNest
This creates new plates on the fly to nest the parts onto, using templates if available, and if not using the Global settings for Plate size defaults. This is a function of QuickPlates, which must be enabled in the Global Settings, Plate tab first. This allows automatic creation of stock, backorder or preorder plates (see Plate Inventory and Plate Lifecycle ).