The plate selector is found in nesting mode. It opens automatically when nesting is entered, and may be called up within nesting mode at any time via the ![]() button.
button.
The Plate Selector was initially designed as a tool for showing plates to nest parts onto, or for showing nested plates, but it has over time developed considerably more functionality. You can also view scheduled and cut plates, find all remnant-related plates, plates containing similar parts or associated with a similar workorder, and much more.
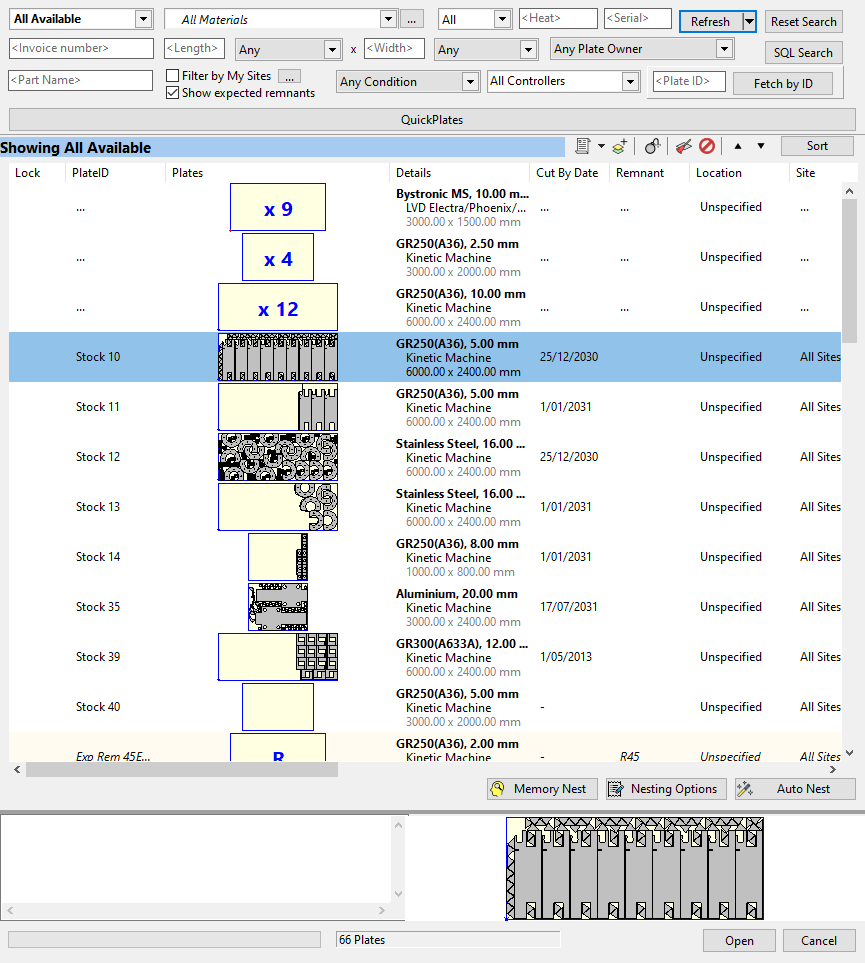
The Plate Selector consists of four Areas, the Filters Pane, the QuickPlates Pane, the Results Pane, and the Selection Preview Pane:
This has a set of filters to allow you control which plates are shown. After setting the Filters up, click the Refresh button to see the results in the database.
A SQL Search button has been provided for advanced users to perform searches using more complex filters than the default set of filters provided.
The Refresh Button has a dropdown with two on/off settings that can be toggled (and are stored per user):
Fetch By ID can be used to quickly load a particular plate if its plateID is known.
The Refresh Button has two switchable options in its drop down menu. The state of these settings is stored per user:
![]() Auto Refresh on Show Plate Selector
Auto Refresh on Show Plate Selector
When the Plate selector is displayed it will auto refresh (ie act as if the user has already clicked the refresh button) under certain circumstances, to speed up interaction. However on large or slow database connections you may want to disable this to avoid waiting on the refresh before changing the filters to a different selection.
This setting is saved in the user settings.
![]() Auto Reset Filters to show Nestable Plates for Workspace Materials
Auto Reset Filters to show Nestable Plates for Workspace Materials
When you have parts open in your workspace to nest, PrimeCut will automatically change the first two filters to All Available plates for Workspace Materials, ie it will show all plates the parts in the workspace can be nested onto. This option will automatically disable when the user changes these filters to anything different to these settings, as presumably they will want to re-use their own choice of filter.
This setting is saved in the user settings.
This shows templates compatible with parts to be nested for quickly creating new stock or preorder plates to nest onto. See Using QuickPlates.
This shows the list of filtered plates. There are a large number of columns, all of which can be reordered, resized and hidden if desired (right -lcick on the column headers to select which columns to display and which to hide). The column layout is remembered for each user.
Plates with a blue R superimposed on them are remnants.
Some remnants which are skeletons (the original plate with holes cut in it where the parts were removed) are shown by the "green bone".
Above the results is a Toolbar containing:
•A description of what is being shown will sit above the list, usually with a light blue background, indicating that the filters are controlling what is being displayed. Sometimes however the results displayed come not from the filters but from some other function, such as the Show Related Plates functions. In this case the description has a yellow background to highlight the fact that the filters are not generating this result set. To the right of this buttons that can also be accessed from the right click (context) menu when plates are selected:
•![]() Reporting, reports on selected plate(s)
Reporting, reports on selected plate(s)
•![]() Add new Plate to Stock. Opens the New Plate window.
Add new Plate to Stock. Opens the New Plate window.
•![]() Explode Selected Groups of plates into individual instances. For unnested new stock plates, if there are a quantity of a given size they may be displayed as a group, with a quantity superimposed on the plate picture as shown above. You will be prompted as to how many plates you want to explode out, including an option to Explode All. There is also an Explode Location option, which breaks the group up by plate location description.
Explode Selected Groups of plates into individual instances. For unnested new stock plates, if there are a quantity of a given size they may be displayed as a group, with a quantity superimposed on the plate picture as shown above. You will be prompted as to how many plates you want to explode out, including an option to Explode All. There is also an Explode Location option, which breaks the group up by plate location description.
•![]() Remove non-selected plates from the results.
Remove non-selected plates from the results.
•![]() Remove Selected Plates from the results
Remove Selected Plates from the results
•![]() ,
,![]() , Sort: You can reeorder the results. When AutoNesting into the results, plates will be tested from top to bottom as displayed
, Sort: You can reeorder the results. When AutoNesting into the results, plates will be tested from top to bottom as displayed
Nesting Buttons ![]() (Memory Nest),
(Memory Nest), ![]() (AutoNest) are provided below the results to allow nesting of workspace parts into the displayed results, in the order they are displayed.
(AutoNest) are provided below the results to allow nesting of workspace parts into the displayed results, in the order they are displayed.
This shows an enlarged picture, and plate notes for a single selected plate. It can be resized vertically using a horizontal splitter bar between it and the Results Pane.
There is also the Open button here, which will load the selected plate or plates into the users workspace, locking them, so the user can nest on them or otherwise edit their properties.
.