When you press the Crop and Remnant button on the menu ribbon a number of options will appear.
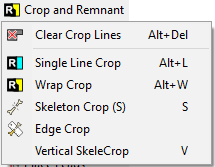
These features are also accessible from the shortcut bar above the editor window.
![]()
The first of these is Clear Crop Lines which as the name suggests will remove all crop lines from the plate. In order to delete an individual crop line where there is more than one on the plate you will need to select only that crop line and then press the DELETE key.
Most of the Create Crop tools Single Line Crop, Wrap Crop and Corner Crop will define offcuts, including Skeleton Crops when defines offcut is enabled.
PrimeCut is set up by default not to allow parts to be nested in the cropped area. This is generally the desired state, however if you are using the crop line primarily to break up the plate you will want to nest parts after it. For example you would nest a few parts, then add a crop line, then nest some more parts, then add another crop line, then nest some more parts to fill the plate. In order to nest the second lot of parts (and the rest after that) you will need to make sure the "Allow nesting in cropped areas" option is enabled on the Processing Options tab of User Options.
Where you have large OD/ID rings or similar parts with large internal drops you can turn these into remnants also. To do this you need to tick the Generate Drops check box under 'Crops and Remnants' in the plate properties window . You may also enable this in the Schedule dialog box via the Generate Drop Remnants check box. The drop remnants will then be available for re-use when you reconcile the plate.
Once you have added crop lines processing will need to be applied to the plate. Note that in Processing Options the same tool selected for Closed Paths (usually a cutting tool) will be applied to crops.
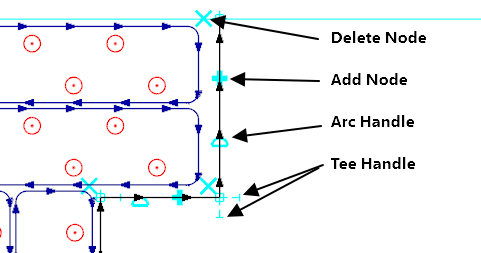
Once a crop line has been added it can be modified using the handles shown below. However, to view these handles you must select one crop line at a time and no other entities. Click away from the crop to end editing, you will be shown momentarily a preview of the offcuts as you complete the edit.
See also
Requirements for a Crop to Define an Offcut
Crop Editing: Moving Crop Nodes
Crop Editing: Splitting Offcuts using Tee Handles
Offcut Preview: Visualizing the Offcuts and Skeletons